Quick answer
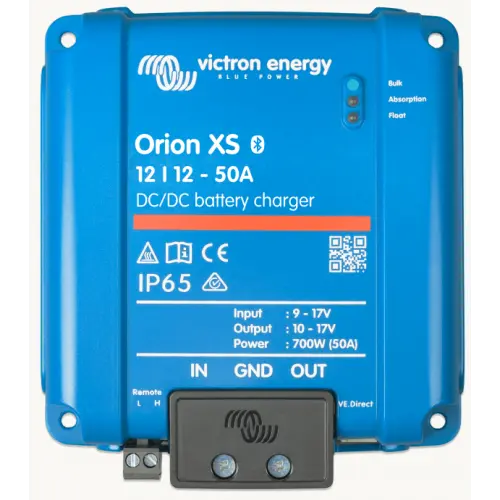
In short: DC-DC charging uses a battery to battery charger to top up your 12V leisure battery from the alternator while you drive. It sets its own voltage and current, so lithium gets a proper charge profile, the alternator isn’t overloaded, and charging keeps working with a smart alternator. Size it below the battery and alternator limits. We usually fit a Victron Orion XS.
Every drive already runs a charger: the alternator. What matters is how much of that energy reaches the leisure battery, and in what form. A DC to DC battery charger decides both. This guide covers what one does, why lithium and newer vans need one, and how we size, wire and fit it. We design, fit and test Victron systems at our Witherslack workshop in Cumbria as an Authorised Victron Energy Installer.
On this page 10 sections
- What is a DC to DC charger?
- Why DC-DC charging matters with lithium and smart alternators
- Do I need a DC to DC charger?
- Isolated or non-isolated battery to battery charger?
- How to size a DC to DC charger
- How to wire up a DC to DC charger
- How to install a DC DC charger
- 12V work and 230V testing are separate
- Want DC-DC charging fitted?
- DC to DC charger FAQs
What is a DC to DC charger?
A DC to DC charger, also called a battery to battery charger or B2B charger, sits between the starter battery and the leisure battery. It takes the alternator’s output and charges the leisure battery at its own controlled voltage and current, whatever the input is doing. So a battery to battery charge is managed by a charger built for the job, not left to the alternator.
Victron calls the leisure battery the auxiliary battery. Inside an Orion XS, four things happen:
- 01
Buck-boost conversion.
The output voltage is set in the app and stays independent of the input voltage.
- 02
A current limit.
The charger never exceeds the current you set, even when the input voltage is higher than the output.
- 03
Four charge stages.
Bulk, absorption, float and storage. With a lithium battery, absorption is fixed at 2 hours by default.
- 04
Separation.
In Victron’s words, “the Orion XS separates the starter battery from the auxiliary battery”. Its input voltage lock-out also stops it running the starter battery down.
The Victron models we stock are under DC to DC chargers.

Why DC-DC charging matters with lithium and smart alternators
Smart alternators on Euro 6 vans
A conventional alternator holds a fixed voltage, around 14V, whenever the engine runs. A smart alternator is managed by the vehicle. On a Euro 6 van its output can swing between roughly 12.5V and 15V in a 12V system, and the vehicle can switch it off completely for stretches of a drive.
That catches out anything that charges on voltage alone. With the alternator off, the starter battery falls back to about 12.6V and looks like a parked van. The Orion XS has engine shutdown detection, which reads the input voltage to decide whether the engine is running, and VictronConnect has settings to tune it for Euro 6 vehicles. Where the alternator stays off for long periods, an external engine running signal can force charging on.
Lithium leisure batteries
A lithium (LiFePO4) battery has very low impedance, so it pulls a high current from the alternator. Victron’s manual says controlled charging protects the alternator in lithium systems from overloading.
Lithium also wants its own charge profile. Our default battery is the Fogstar Drift Gen2. Fogstar’s spec sheet for the 12V 230Ah gives a bulk charge of 14.4V and a float of 13.5V. Its DC-DC set-up guidance gives a bulk range of 14.2V to 14.4V and recommends 14.2V bulk with 13.5V float on Victron equipment, so the Victron setting sits inside the sheet’s range. It takes charge from 0°C to 55°C, and a built-in heater warms the cells to 5°C before charge current goes in. A DC-DC charger set to the right battery preset delivers that profile on every drive. Our guide to campervan leisure batteries explained compares the chemistries, and our lithium leisure batteries are in the shop.
How to charge a leisure battery when driving
There are two common ways. A split charge relay joins the two batteries while the engine runs, so the leisure battery gets whatever the alternator happens to give. A DC-DC charger sets the voltage and current itself, so the charge is the same on every drive. With lithium or a smart alternator, that control is the whole point. If your lithium battery isn’t filling up on the road, our guide to lithium not charging while driving goes into alternator capacity in depth. Solar does the same job when you’re parked; see solar panels for campervans.
Do I need a DC to DC charger?
The short answer
Yes, if your leisure battery is lithium, your van has a smart alternator, or both. Victron’s manual says Euro 6 vehicles use a smart alternator managed by the vehicle. With lead-acid on an older van with a fixed-voltage alternator, it depends on the cable run and how you use the van. If you’re unsure which you have, ask Tom on a free 30-minute call.
Isolated or non-isolated battery to battery charger?
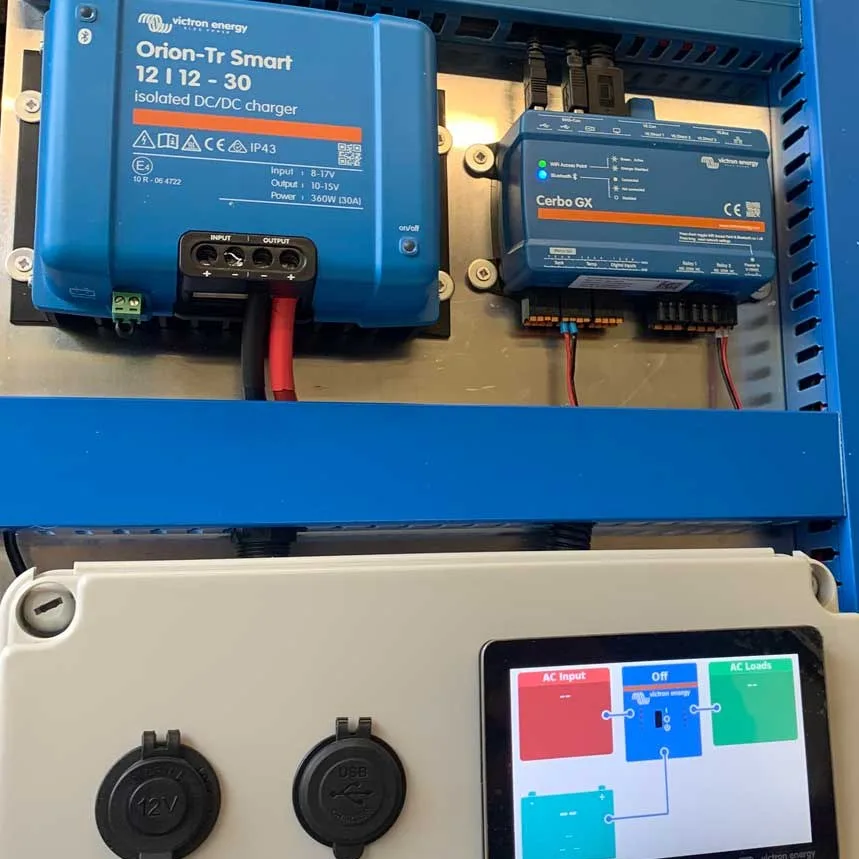
A non-isolated charger shares one negative between its input and output. In a van, that negative usually runs through the chassis, which the starter battery negative is already bonded to. An isolated charger keeps input and output galvanically separate. Victron says its isolated Orion-Tr Smart “allows the input and output to have separate chassis grounds”. Victron also describes the Orion-Tr Smart as an adaptive 3-stage charger, so it has no storage stage.
| Non-isolated Orion XS |
Isolated Orion-Tr Smart |
|
|---|---|---|
| Input and output negative | One shared negative | Galvanically separate |
| Separate chassis grounds | ✕ | ✓ |
| Charge stages | 4 (bulk, absorption, float, storage) | Adaptive 3-stage |
| Where we fit it | Steel-bodied vans with the starter negative on the chassis | When the two sides must keep separate negatives |
The Orion XS is a non-isolated B2B battery charger, and in a steel-bodied van with the starter negative on the chassis, that suits most systems. On our boards, its negative lands on the Lynx Distributor’s negative busbar. We fit an isolated Orion-Tr Smart only when the two sides must keep separate negatives, or when the vehicle’s electronics need that separation. Our guide to earthing and bonding your campervan shows how the chassis fits in.
How to size a DC to DC charger
Size it to the lowest of three limits, checked in this order.
- The battery’s maximum charge current. It’s on the datasheet. Fogstar lists 230A (1C) for the Drift Gen2 12V 230Ah, so a 50A or 70A Orion XS is well inside it.
- The alternator’s spare current. Start from the alternator’s rating, then allow for what the van runs on a drive: lights, blower, wipers, heated seats. What’s left is what the charger can safely draw. Victron notes that an Orion XS can’t output more than the alternator supplies. This is usually the real limit.
- Heat. The Orion XS 12/12-50A and 12/12-70A give full output up to 40°C and derate by 1.5% for every degree above that, so a charger in a hot, closed locker delivers less than its rating.
The Orion XS current is adjustable from 1 to 50A on the 12/12-50A and from 1 to 70A on the new 12/12-70A, so a 12V battery to battery charger can be turned down to suit a small alternator. If you need more, Victron allows Orion XS units to run in parallel. That adjustment is the main thing to look for in any 12V DC to DC charger, because it lets a 12V DC-DC battery charger be matched to the alternator rather than the other way round.
We size the charger around your alternator first. The lithium not charging while driving guide shows how to size a DC-DC charger around your existing alternator. The unit we fit most is the Orion XS 12/12-50A, from the Victron Orion XS range, usually charging a Fogstar Drift battery. Where the alternator and battery can take more, the new Orion XS 12/12-70A gives up to 70A from the same size of unit. If you’re still planning the whole system, start with planning your campervan electrical system.
How to wire up a DC to DC charger
A DC to DC charger wiring diagram for a van has four parts.
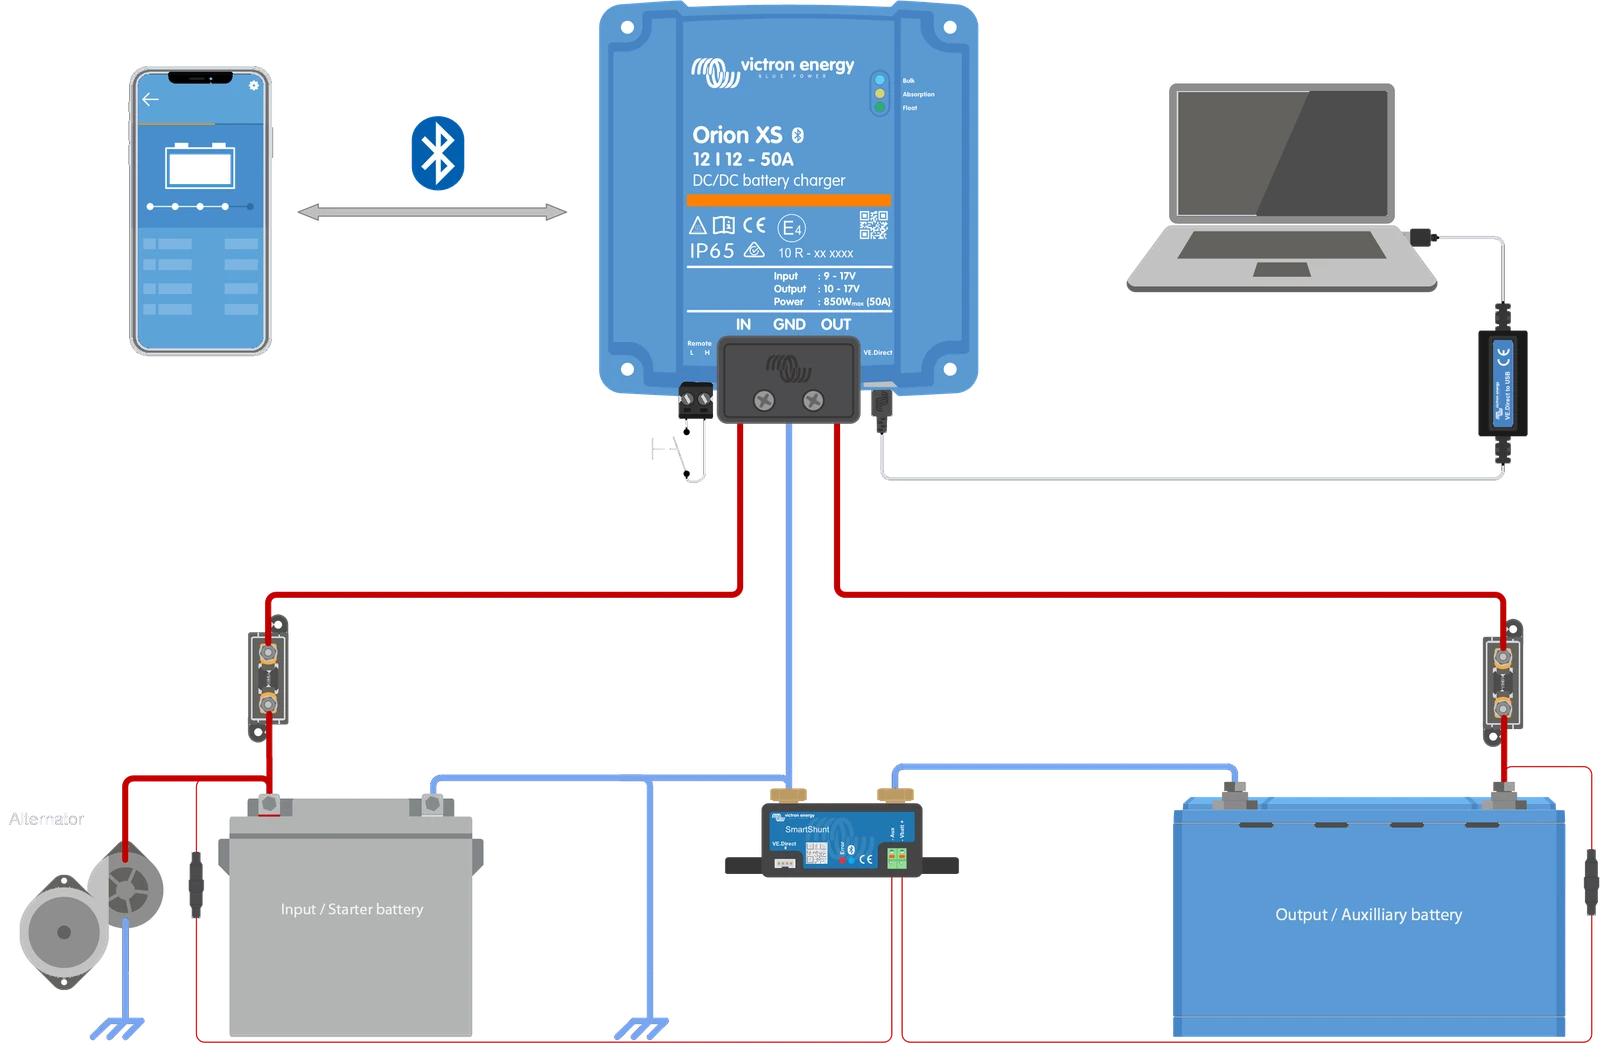
Input
starter battery positive, through a fuse, to the Orion XS input.
Output
Orion XS output, through a fuse, to the leisure battery side of the board.
Negative
one common negative. Where it meets the chassis, the lug goes on bare metal with the paint removed, for a low-impedance joint.
Control
the remote on/off connector, an optional engine running signal, and a VE.Direct cable to the Cerbo GX MK3.
For the Orion XS 12/12-50A, the cable and fuse table in Victron’s manual calls for an external battery protection fuse of 60 to 70A in each positive cable, fitted close to the battery it protects. Minimum cable is 16 mm² for runs under 5 m and 4 AWG (21.2 mm²) from 5 to 10 m, in flexible, fine-stranded Class 5 copper. The charger has screw terminals: Victron gives 4.5 Nm for 16 mm², held for at least 5 seconds so the screw settles. For the Orion XS 12/12-70A, Victron’s table calls for an 80 to 100A battery protection fuse in each positive cable and a minimum of 25 mm² (4 AWG) for runs under 10 m, tightened to 5.6 Nm. These sizes are Victron’s own figures for each charger, and on this 12V run we follow the maker’s table.
| Victron manual figure | Orion XS 12/12-50A | Orion XS 12/12-70A |
|---|---|---|
| Battery protection fuse, each positive cable, close to the battery | 60 to 70A | 80 to 100A |
| Minimum cable | 16 mm² under 5 m; 4 AWG (21.2 mm²) from 5 to 10 m | 25 mm² (4 AWG) under 10 m |
| Cable type | Flexible, fine-stranded Class 5 copper | Flexible, fine-stranded Class 5 copper |
| Terminal torque | 4.5 Nm on 16 mm² | 5.6 Nm on 25 mm² |
| Hold the torque | At least 5 seconds | At least 5 seconds |
| Ingress protection | IP65 | IP20, dry indoor only |
At the battery, fuse and busbar ends, every cable gets a correctly sized crimped lug; see correct cable termination. Fusing for the rest of the system is covered in lithium leisure battery fuse sizing and choosing the right DC fuse.
Engine running detection is automatic by default. The remote on/off function uses a two-pole remote connector, the L-pin and the H-pin, and switches the charger on and off without breaking the heavy DC cabling. An external engine running signal goes to the L-pin, where more than 8V overrides the engine shutdown detection and activates the charger. Victron says to leave engine shutdown detection enabled when you use one.
How to install a DC DC charger
Mounting rules
Victron’s manuals set the mounting rules for the Orion XS. Mount it upright on a non-flammable surface with the power terminals facing down, keep at least 10 cm clear all round for cooling, and fit it close to the battery but never directly above it. The heat sink can reach 90°C, so the mounting surface has to withstand that.
We mount the 12/12-70A the same way: upright, with the terminals facing down and the fan inlet kept clear, because that’s the orientation Victron quotes for full output up to 40°C. The 12/12-70A is rated IP20, and Victron says it’s for dry indoor installation only.
Set it up in VictronConnect before the leisure battery goes on the output: choose the battery preset, lithium or lead-acid, then adjust the engine shutdown settings if it’s a Euro 6 van. Then test it. Start the engine and it should begin charging; switch off and it should stop.
For monitoring, a VE.Direct cable links the Orion XS to a Cerbo GX MK3, which puts charging on your phone through Victron’s VRM portal. With a DVCC-compatible BMS, DVCC control needs current Orion XS firmware, so check it in VictronConnect before you set it up, and keep the GX device up to date too. More on battery monitoring, the Victron Cerbo GX and our remote monitoring service. If a fitted charger stops working, start with DC-DC charger not charging.
Can it charge the starter battery the other way?
In an emergency, yes, as long as the Orion XS is on current firmware; check for updates in VictronConnect. It charges a flat starter battery from the leisure battery for 15 minutes, then pauses for a 5-minute settling period while you start the engine. The current is half the charger’s rating, or the lowest limit you’ve set, so up to 25A on the 12/12-50A and up to 35A on the 12/12-70A. Our Orion XS reverse charging guide covers it step by step.
12V work and 230V testing are separate
12V side
A DC-DC charger is 12V work. The 12V side is inspected and tested against BS EN 1648-2 and Annex A721 of BS 7671.
230V side
A 230V side is a separate job. The hook-up inlet, the AC-in consumer unit and the inverter/charger output are designed, installed and tested to BS 7671 Section 721, and the MET and chassis bond are checked as part of that. Our guide to 12V and 230V systems explains the split, BS 7671 Amendment 4 covers what changed, and our inspection and testing service checks a system you’ve built yourself.
Want DC-DC charging fitted?
We fit DC-DC charging at our workshop at two fixed prices, shown on our campervan electrical installation page and our motorhome electrics page:
DC-DC charger fit
£895
Lithium and DC-DC upgrade
£2,195
Building it yourself? Our Self-Build package starts with a consult. We then design a custom kit and a wiring diagram for your van, and you fit it.
Book your free 30-minute call with Tom
DC to DC charger FAQs
What is a DC to DC charger?
It’s a charger that runs from your van’s 12V supply instead of mains. It takes power from the starter battery and alternator and charges the leisure battery with its own voltage, current and charge stages. You’ll also see it called a battery to battery charger, a B2B charger or a DC-DC charger.
Do I need a DC to DC charger?
Almost certainly, if your leisure battery is lithium or your van is Euro 6 with a smart alternator. A plain relay can’t limit the current or hold a steady charge voltage while the alternator’s output keeps changing. With lead-acid and an older, fixed-voltage alternator, ask us before you buy one.
How to size a DC to DC charger?
Take the lowest of three numbers: the battery’s maximum charge current from its datasheet, the alternator current left after the van’s own loads, and the charger’s output once heat derating is allowed for. In most single-battery vans the alternator sets the limit, not the battery.
How to wire up a DC to DC charger?
Fuse the starter battery positive into the charger input and fuse the output into the leisure side, each fuse close to its battery. Bring the negatives to one low-impedance point, then add the remote and any engine running signal. Take every cable size and fuse rating from the maker’s table.
How to install a DC DC charger?
Mount it upright on a non-flammable surface, terminals down, with space to cool, near the battery but never above it. Pick the battery preset in VictronConnect before connecting the leisure battery, then prove it: engine on, charging starts; engine off, it stops.
How does DC DC charging work with a smart alternator?
It charges while the Orion XS detects the engine running. That detection reads the alternator voltage, which a Euro 6 smart alternator varies between roughly 12.5V and 15V. The start and shutdown voltages can be tuned in VictronConnect. If the alternator stays off, an engine running signal on the L-pin forces charging on.
Sources
- Victron Energy, Orion XS 12/12-50A DC-DC battery charger manual, sections 2.1, 2.2, 3.1 to 3.5, 3.8, 3.10, 3.11, 4.1, 4.2 and 6.1
- Victron Energy, Orion XS 12/12-70A DC-DC battery charger manual, sections 3.1, 3.4, 3.5, 4.2 and 6.1
- Victron Energy, Orion XS DC-DC battery chargers datasheet
- Victron Energy, Orion-Tr Smart DC-DC charger isolated
- Victron Energy, Cerbo GX manual: installation
- Fogstar, Drift Gen2 12V 230Ah spec sheet
- Fogstar, Knowledge Hub: charger settings
- IET, BS 7671 Wiring Regulations
About the reviewer: Tom Alderdice
Tom holds the 18th Edition (BS 7671) and inspection and testing qualifications, plus NCC training in caravan and motorhome electrics.
Tiny Build Electrics is an Authorised Victron Energy Installer. See Tom’s full qualifications